Showing posts with label Grassland Border. Show all posts

Thursday, January 16, 2014

For Father (Fur Vater)

MemoryBox has some great new stencils.  I spent summers in Canada and I always loved the white Birch Trees so I jumped at the chance to use the background stencil for a birthday card perfect for a Father.  This is a copy of my blog submission for the Poppystamps Design Team.

FurVater

Signature

Supplies used:
Birch Trees Stencil [885270]
Trotting Pony Die [992]
Grassland Border Die [825]
ColorBox Ink in Ice
Ink in shade of brown
Ink in shade of blue 
Cardstock in various colors
Adhesives
Greeting stickers
Embellishments (to affix greeting inside card)
Sponge (to buff out any ink)

The greeting used for the banner is a German sticker - Fur Vater.  I sponged the color blue (same color ink used to top the stencil background) around the banner edges.  I ran the Grassland Border die in two colors of green and then ran the Trotting Pony twice in a dark brown and a light brown.  
For the inside (photo below), I cut two circles one blue and one white.  Then I added the birthday greeting sticker to the white inner circle.  Then I used to circle brads to affix it to the white background inside the card.
Jan16InsideGreeting
Signature
I hope you are enjoying our blog blitz and we inspire you to get creative with the new Poppystamps dies and new MemoryBox stencils.
If you comment on my post on the Poppystamps blog site between now and January 24th, 2014 you have a chance to win the Birch Trees Stencil for your collection.  Check back on January 27th at http://poppystamps.typepad.com when all the winners for the blog blitz will be posted.  
Remember, comments on my blog here, while appreciated do not qualify for the free stencil.  You must post your comments on the Poppystamps blog.
Best of luck!
 Kimberly WM copy

Wednesday, January 1, 2014

Happy New Year and look into spring with my Chalet Window for Poppystamps Design Team

Springtime Chalet Window

As we say goodbye to 2013, the daylight stays a little longer and the thoughts of Spring begin to fill our heads.  Here is a my look into Spring from outside the chalet window.

January1SpringChaletWindowPeek
Signature
Supplies:
825 Grassland Border
968 Fairy Flower
963 Climbing Vine
898 Aston Side Table
872 Curious Cat - Small
891 Small Verano Lamp
916 Grand Chalet Window
 876 Pouncing Cat 
Another view below with the windows open to reveal the cats inside.
January1SpringChaletWindowOpen

Signature
For this card, I used the Verano Lamp Small in a different way. The base of the lamp became my vase for the flowers.  The top of the lamp became my lampshade for the handing lamp.  I added a tiny bit of yellow chalk under the lamp to represent the glow.
Next, I used the Fairy Flower and cut the stem with the flowers to use as the flowers in the vase.  I ran the flower again in both a darker green and then pink and then purple.  I cut the flower (or the leaf in the darker green) and glued it to the lighter green stem base.
I ran the grassland border a few times in two different shades of green for some dimension.  Finally, I ran the climbing vine through twice and weaved it in through the openings of the window.  Since I love cats, I added a couple that is visible when the windows are open a little wider.
Wishing a Happy New Year (and for my friends in Germany, Glückliches neues Jahr) to all.
Kimberly WM copy


Saturday, September 7, 2013

Brewing - My August 20 Poppystamps Design Team Post

Something is Brewing - Halloween
This card is a Halloween window where a cauldron is brewing something up for Halloween under the watchful eye of a black cat.


I love Poppystamps dies, as they are so versatile. In this card I cut the table down in height and cut the tips off the fence to give it a more "Halloweenish" feel.
I cut the branches from the Memory Box Orchard Frame Die and applied two of the three trees from the Memory Box Birch Trio.
Supplies you will need:
Poppystamps Dies:
Small Madison Arched Window [848]
Ashton Side Table [897]
Sitting Cat [860]
Picket Fence [827]
Grassland Border [825]
Walking Cat [859]
Memory Box Dies:
Orchard Tree Frame (98300)
Debutante Frame (98297)
Birch Trio (98617)
Grim Cauldron (98700)
Ghastly Ghosts (98701)
Tiny Bubbles (98699)
Memory Box Stamps:
Witch You Happy Halloween(B1973)
Memory Box Paper:
SH-Dill (44010)
SH-Jack-o-Lantern (44017)
SH-Licorice (44022)
SH-Meadow (44024)
Other:
Adhesives (glue, tape, circles or foam adhesives), scissors or paper trimmer to cut paper small enough to run through a die-cut machine, die-cut machine, black ink for stamping greeting inside card.
Prepare the frame:
Step 1:  Using Licorice sheet paper run the Orchard Tree Frame through your die cutting machine.  Trim out all but the center tree.
Step 2: Using Jack-O-Lantern card stock run the Debutante Frame through the die cutting machine.  Carefully attach the Orchard Frame to the Debutante Frame.
Step 3:  Run the Birch Trio through the die cutting machine and trim off one tree.  Attach the remaining two trees over the tree left in the Orchard Frame. This helps to hide it and secure the birch trees to the frame.
Prepare the Window:
Step 1:  Die cut in Licorice card stock the Madison Small Arched Window. Die cut the Sitting Cat (and 3 of the Walking Cat – you will use him later). Die cut the Ghosts, Cauldrons (you will use only the large one).
Step 2: Die cut in Meadow card stock the Bubbles and the ghosts.
Step 3: Die cut in White card stock the ghosts. Also cut enough white card stock to go behind the window. This is where you will assemble your scene. Place double sided adhesive tape to the back of the white card stock. This will make it easier to adhere later.
Step 4: Die cut in Jack-O-Lantern, the Pumpkins and the Bubbles.
Step 5: Die cut in Vanilla Bean the Aston Side Table.
Step 7: Assemble the components of the window and adhere to the white base. Attach with one level of foam adhesives the black window frame (Madison Small Arched Window) to the white backing over the scene. 
Step 8: Peel the strips from the back of the white backing and attach your window scene to your Debutante Frame.
Finish the Card’s Exterior:
Step 1: Cut the Grassland border in Dill card stock.
Step 2: Cut the Picket Fence in Licorice card stock.
Step 3: Weave both together a little and adhere to Debutante Frame.
Step 4: Add ghosts in Meadow, Licorice and White (that you cut earlier) randomly around the card. If you have the Bats die cut you could use some of those as well.

Complete the inside of the card:
Step 1: Using adhesive of our choice adhere the three Walking Cats you cut earlier.
Step 2: Stamp the “Witching You A Happy Halloween” stamp.  Then turn the stamp and stamp the witches hat that is located on the side of the greeting stamp.
Viola! You are done! I hope you have enjoyed a peek into my Halloween collection.


Friday, August 16, 2013

Summer Window - My Poppystamps Design Team blog post for 13 August 2013

SUMMER BIRTHDAY WINDOW

I am part of the Poppystamps Design Team and this is my first of two cards for Poppystamps blog in August 2013. I hope you enjoy this card designed for those with late summer birthdays.
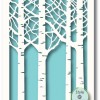
A great feature of the Poppystamps Grand Madison French Doors is that you can use them closed or open. If you want to create a dimensional look on the Grand Madison French Doors simple stack 3D foam adhesives to the back of the windows. To give a little dimension use one or if you need a little more clearance to frame a scene pair them and adhere to your background.
Supplies you will need:Poppystamps Dies:
Grand Madison French Doors (849)
Grassland Border (825)
Curious Cat (875)
Curvy Stem (851)
Memory Box Dies:
Petite Cake (98547)
Primula Bloom (98149)
Scalloped Cake Stand (98541)
Garden Pots (98532)
Dancing Butterflies (98576)
Memory Box Paper:
Vanilla Bean (10N Notecard, 44044 paper)
SH-Lavender (44021)
SH-Sunflower (44041)
SH-Meadow (44024)
SH-Cherry Blossom (44004)*
SH-Dill (44010)
Other:
Foam adhesive squares, glue, adhesive tape, glue dots, scissors or paper-trimmer, glitter, die-cut machine, ink for stamping greeting
Prepare the base card:
Step 1: Take your cardstock and score the front horizontally at inch intervals. My cardstock, Vanilla Bean, is from Memory Box.
Step 2: Rotate your card vertically and beginning on the first section score at ½”, 1”, and 1 ½” and so forth to the end of that line. Next, begin scoring the next line at 1”, 2”, 3” and so forth to the end of the card. Continue alternating how you scored the first section and second section until you have created a brick pattern to the top of the front of the card.
Prepare the cake:
Step 1: Complete the die cutting. Die cut the cake layers, the cake stand, and make several die cuts of the Primula Bloom in two colors. Apply glue to the cake and then cover with ultra-fine glitter – let dry!
Step 2: Select the flowers (from the Primula Bloom) and colors you wish to affix to each cake layer. Make sure you have a green color suitable for a leaf and make a cut of that as well. Assemble the flowers if you wish to add more than 1 flower to each layer. On the Primula Bloom you will see a leaf. I cut that leaf off as well as the largest bloom for this cake.
Assemble the window Scene:
Step 1: Cut out a background for the wallpaper or “paint” color of the interior room. Apply foam squares to the French doors. Place foam squares on the back of each layer of the cake and put onto the background paper (here it is the latte polka dotted Memory Box paper). Place the cake stand (also on foam adhesive square). Apply the flowers to the cake and then glue the “frosting” to each cake layer. Note, the frosting layers are here in lavender.
Step 2: Cut out the cat. Once the cake is complete adhere the cat with a foam adhesive. Then position your French doors over the top of the paper scene. Note: If you are going to open your doors as pictured here, make sure you open them before you glue to background scene.
Complete the card:
Step 1: Adhere the window scene to the base card with your preferred method. I used more foam adhesives but you could use glue dots or double-sided tape if you prefer.
Step 2: Die cut the grass border, the butterflies, flowerpots and single stem.
Step 3: Apply the grass border. There will be a little space at the right side of card to fill. That is where the flowerpots come into play. Overlap them slightly and glue dot (or glue). Then affix each single stem to middle of pot and glue dot. You won’t see the glue dot as you are now going to put the pots on the card where the grass ends. From the Primula Blooms you cut for the cake, choose some to make flowers to affix to the top of the stems in the flowerpot. Die cut the butterflies and glue dot to the grass, the window, the brick, wherever you choose.
Step 4: You are almost done! If you choose to use a birthday greeting, stamp your birthday greeting and cut out. You may place it straight across the top just inside the French doors or you may wish to place it diagonally above the cat. Tuck them into your window scene (if you are using open windows like I did); otherwise, simply stamp your greeting inside the card.
Step back and smile!
*Cherry Blossom paper was used with the Primula Bloom and placed in the center of the flowers on the flowerpot. They are slightly hard to see with the French doors open.